
Benvenuti a questo nuovo capitolo sulla scrittura cinese! Ci eravamo lasciati con un post molto generale, all’interno del quale spiegavo a grandi linee cosa mi avesse portato a voler intraprendere questo percorso. Qui si comincia con qualcosa di più “tecnico”; Vorrei far partire il nostro viaggio nella scrittura cinese dalle basi della stessa, cioè i tratti. Ogni carattere è formato da tratti, che variano notevolmente nel numero, a partire da 1, fino a decine; sapere come disegnare i tratti è la base da cui partire per poter scrivere in modo corretto. Per saper come disegnare i tratti è necessario sapere l’elenco degli stessi, ed è ciò che vedremo qui, cominciando dagli 8 principali. Al fine di una più completa comprensione del discorso, andremo anche a vedere, nei prossimi articoli, l’attrezzatura necessaria alla scrittura, come l’inchiostro, il pennello, la carta, ecc, senza tralasciare anche l’ambiente stesso, elemento fondamentale.
In questo articolo passeremo in rassegna i primi due tratti, quello orizzontale e quello verticale. Ho deciso di farvene vedere due alla volta per evitare di scrivere articoli esageratamente lunghi e per una questione di “ordine” all’interno del blog; scrivendo troppo, e mettendo troppa carne al fuoco si rischierebbe solamente di confondere, o peggio ancora, di annoiare il lettore, il quale potrebbe abbandonare l’idea di voler approfondire il discorso ancora prima di cominciarlo. Quindi restate sintonizzati e che le danze abbiano inizio!
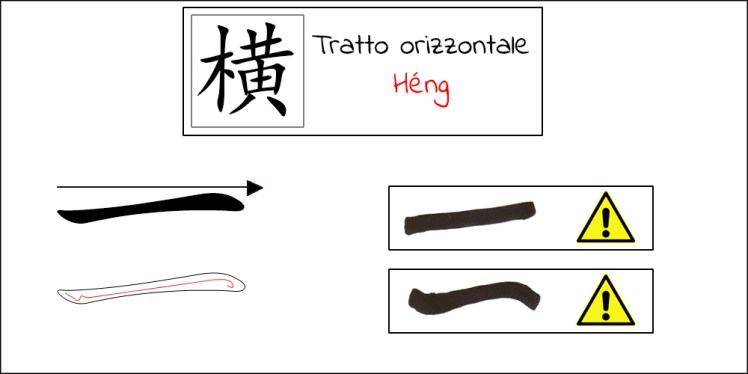 Si notino, nei due riquadri contrassegnati dal segnale di pericolo, i più comuni errori che occorrono durante l’esecuzione del tratto orizzontale; a sinistra potete vedere che la linea non presenta né capo né coda, come se fosse un trattino disegnato con un pennello quadrato. I motivi che portano a questo tipo di errore risiedono nella mancanza del movimento del pennello all’entrata e all’uscita del tratto. Quando uno di essi viene disegnato nel modo errato, l’occhio nota subito che c’è qualcosa che non va, come un errore, una macchia stonata all’interno di un quadro, non visibile immediatamente ma che lascia l’osservatore con una sensazione di disagio. E’ opportuno tuttavia segnalare che è possibile trovare tratti orizzontali disegnati in modo simile a questa versione “errata”, specialmente nei caratteri in cui ve ne sono più di uno; solitamente solo il principale, il più lungo, segue le regole menzionate. Il secondo errore più comune è in realtà l’opposto di quello appena visto; se il pennello effettua movimenti troppo ampi, la testa e la coda del tratto saranno così marcate che prenderanno il sopravvento sull’armonia generale del tratto stesso, il quale avrà più la forma di un serpente.
Il primo tratto che andremo a vedere è quello orizzontale, chiamato anche “héng”, il cui significato è, infatti, “orizzontale” e il cui carattere è “横”. Nell’immagine postata potete vedere come muovere il pennello per ottenere un risultato soddisfacente; i tratti, infatti, non sono semplici linee nere senza alcuna vita, ma vere e proprie opere d’arte. Innanzitutto il tratto orizzontale non segue esattamente una linea retta, ma si inarca leggermente verso l’altro. La testa e la coda del carattere sono più “grandi” della parte centrale. Per una corretta esecuzione di 横 agite in questo modo: appoggiate il pennello nel punto in cui il tratto dovrà cominciare, dopo di che ruotate lo stesso leggermente verso il basso e verso destra, al fine di far prendere alla testa del tratto una forma definita. A questo punto muovetevi più velocemente, verso destra, in modo che il tratto non presenti alla vista delle interruzioni o dei tentennamenti. Arrivati alla coda del tratto, il pennello andrà nuovamente ad effettuare lo stesso movimento utilizzato precedentemente, al fine di dare una forma definita anche al termine del tratto stesso. Questo metodo di scrittura non è ovviamente l’unico, vi sono diversi stili che comportano diverse modalità di utilizzo del pennello, ma all’inizio potrà essere sperimentato questo tipo di approccio, considerando il fatto che il tratto orizzontale, sebbene non sembri, è molto difficile da tracciare nella giusta maniera. Esso infatti rappresenta uno dei tratti più importanti nella calligrafia cinese, grazie al quale spesso un carattere assume equilibrio o forza.
Persino la posizione di tale tratto determina il proprio modo di essere scritto; immaginate il carattere orizzontale come una trave di sostegno di un tetto, posto in posizione superiore, a proteggere ciò che sta sotto, come per esempio nel carattere “xià”: 下. Provate ora a pensare ad una sorta di “divisorio”, un “davanzale” posto al centro di due piani, come nel carattere “liù”: 六. Infine il tratto orizzontale può fungere da sostegno inverso, un piano sul quale mettere le cose, una sorta di libreria, o mensola, come nel carattere “tŭ”: 土. Alla luce di questi esempi potete capire come il tratto orizzontale contribuisca in modo decisivo alla costruzione del carattere già a partire dalle proprie fondamenta.
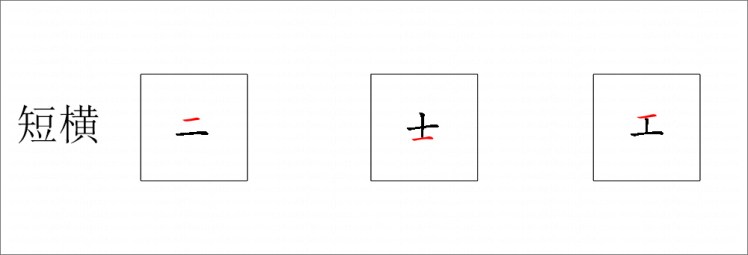
Nelle due immagini sotto riportate ho pensato di farvi vedere in modo più “schematico” i due tipi di tratto orizzontale che esistono in calligrafia, quello lungo e quello corto, con tre esempi del loro utilizzo all’interno di caratteri. Il tratto rosso è quello indicativo:

Qui sotto il tratto orizzontale corto:
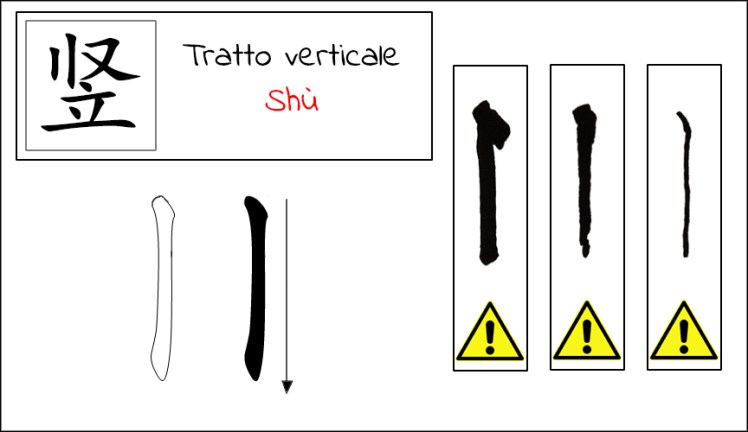
Nei riquadri contrassegnati con il simbolo di pericolo è possibile vedere gli errori più comuni durante l’esecuzione del tratto verticale. Il n°1 è stato eseguito con movimenti del pennello troppo ampi alla testa del tratto (o lo stesso è stato appoggiato in modo troppo deciso, provocando una grossa macchia di inchiostro). Il n°2 è stato tracciato senza mantenere una pressione costante del pennello sulla carta. Questo tipo di errore è molto comune quando si comincia a disegnare caratteri in quanto è molto difficile mantenere la mano ferma; questo tipo di situazione porta all’errore n°3, in cui il pennello non è stato appoggiato abbastanza, provocando una sorta di linea continua e senza forza.
Il secondo tratto che vedremo in questo articolo è quello verticale, denominato “shù”, il cui significato è, infatti, “verticale” e il cui carattere che lo rappresenta è “竖”. Mentre il tratto orizzontale viene tracciato con movimento che si inarca leggermente verso l’alto, il tratto verticale rappresenta la spina dorsale di un carattere, uno scettro o un pilastro e va quindi disegnato perfettamente verticale, dall’alto verso il basso. La forma del tratto verticale ricorda molto quella dell’orizzontale, anche nell’esecuzione dello stesso. Per una corretta esecuzione di 竖 agite in questo modo: appoggiate in modo abbastanza (non troppo) deciso il pennello con un angolazione di circa 45° al fine di dare una forma definita alla testa del tratto e ruotare lo stesso leggermente per portarlo in linea con la direzione che avrà il tratto stesso. Scendere verso il basso con un movimento più veloce (come nel tratto orizzontale, la parte centrale è più stretta) e arrivati al termine del tratto ruotare nuovamente il pennello per dare la forma alla coda. E’ possibile tornare indietro di qualche millimetro al fine di ottenere un effetto più naturale. Nell’immagine postata è possibile vedere il movimento del pennello nell’esecuzione di 竖. Pensate al tratto verticale come una colonna portante di un carattere; esso può intervenire a sostenere delle parti, come in “shàng”: “上 “, oppure fungere da divisore in parti simmetriche, come in “mù”: “木”; può mantenere in equilibrio una parte come un ago di bilancia, come in “xià”: “下” o dividere in due parti non necessariamente simmetriche un carattere, come in “wài”: “外”. La presenza di “héng” e “shù”, quindi, è di fondamentale importanza della stesura di un carattere.
Come detto precedentemente, questo non è l’unico modo di disegnare 竖, in questo caso una variante è molto utilizzata, rappresentando quasi una cosa a sé stante; si tratta dell’ ”ago sospeso”, detto anche “ago verticale”, in cui il tratto finisce a punta e il quale può essere visionato nelle immagini successivamente postate. In questo caso il pennello, anziché effettuare il movimento di definizione della coda del tratto, si alzerà sempre più dal foglio, producendo un assottigliamento che culminerà con la punta.
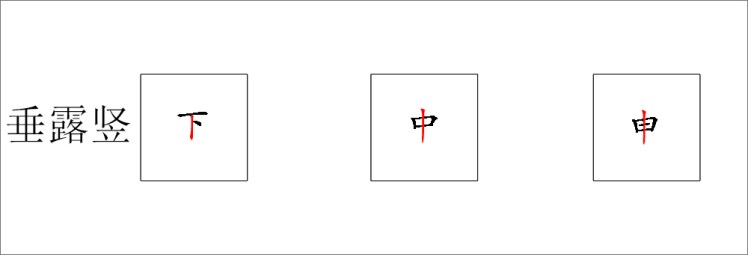
Come per il tratto orizzontale, provvedo a mostrarvi i due tipi di tratto verticale con esempi di caratteri. In questo modo sarà più semplice rendervi conto della differenza visiva. La goccia di rugiada:
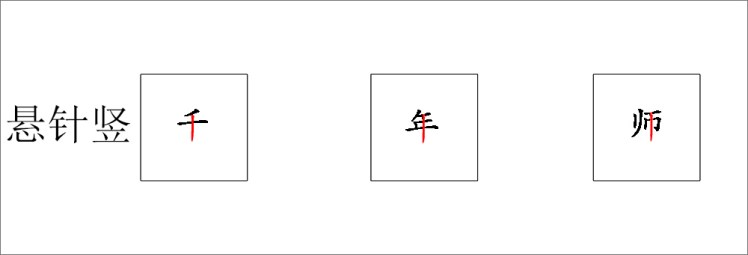
E qui sotto esempi di utilizzo dell’ago sospeso:
Alla luce degli errori menzionati in quest’articolo, come fare per evitare di incorrere in essi? Sembrerà una cosa banale, ma il segreto per padroneggiare l’arte della calligrafia è semplicemente scrivere, scrivere e poi ancora scrivere, fino a che i tratti verranno fuori in modo naturale. Ecco, quest’ultima definizione, sebbene semplice, racchiude in essa un profondo e lungo lavoro che dovrebbe partire in primis da noi stessi. La naturalità dei gesti è un qualcosa che ha a che fare con la natura stessa; se saremo in grado di far nostra la consapevolezza di far parte di un tutto, allora anche dei “semplici” movimenti quali l’uso di un pennello per tracciare un “semplice” tratto diventeranno un qualcosa alla quale non penseremo nemmeno più. La pratica del principiante di solito parte dalla scrittura dello stile regolare, in quanto il più standardizzato e contenente in sé la maggior parte delle tecniche di scrittura col pennello, mentre si potrà passare alla scrittura veloce e persino al corsivo solamente una volta apprese e fatte nostre le tecniche base. La calligrafia cinese, allora diventerà come l’apprendimento dello stare in piedi, camminare ed infine correre. Se vogliamo partire dalla corsa senza nemmeno sapere come stare in piedi finiremo col cadere e farci male, a volte perdendo la voglia di voler ricominciare. Quindi prendete il vostro foglio, il vostro pennello e scrivete, scrivete, scrivete.

Welcome to this new chapter of chinese writing! Last time I left you with a very general post, in which I explained in a quite general way what had led me to take this “path”. Here we begin with something more “technical”; I would like to start our journey into chinese writing from the bases of the same: strokes. Each character is made up of strokes that vary considerably in the number from 1 to much more; knowing how to draw strokes is the basic thing from which to begin to write correctly. To know how to draw strokes you need to know at least strokes list, and that’s what we’ll see here, starting with the top 8. For a more complete understanding of the subject, we will also see in next articles the necessary writing equipment such as ink, brushes, paper, etc., without neglecting the environment as well.
In this article I’ll review the first two strokes, the horizontal one and the vertical one. I’ve decided to see two at a time to avoid writing overly lengthy articles; writing too much, or doing too much at once would only risk confusing, or worse, bore the reader, who could abandon the idea of wanting to know more even before to start it. Then stay tuned and let’s start!
In the two boxes marked with the danger signal are displayed the most common mistakes made when performing the horizontal stroke; upper one shows you that the line has no head or tail, as if it’s a stroke draw with a square brush. The reasons leading to this type of mistake lie in the lack of movement of the brush at the entry and exit of the stroke. When one of them is drawn in the wrong way, the eye immediately notes that there is something that doesn’t go as well as it should go. It should be noted, however, that horizontal strokes can be drawn similarly to this “wrong” version, especially in characters where there are more than one; usually only the main one, the longest, follows the mentioned rules. The second most common mistake is actually the opposite of the one just seen; If the brush does too large movements, the head and tail of the stroke will be so marked that they will overcome the overall harmony of the stroke itself.
The first stroke we’re going to see is the horizontal one, also called “héng”, whose meaning is, in fact, “horizontal” and whose character is “横”. In the posted image you can see how to move the brush to get a satisfactory result; strokes, in fact, are not simple black lines without any life, but true art work. First of all, the horizontal section does not exactly follow a straight line; the head and tail of the stroke are bigger than the central part. For a correct running of 横, move in this way: place the brush at the point where the stroke should start, then turn it slightly downwards and to the right to give to the stroke head a definite shape. At this point, move faster, to the right; on this way the stroke won’t show any breaks or hesitations. Once at the tail of the stroke, the brush will again perform the same movement used before, in order to give a defined shape even at the end of the stroke itself. This method of writing is obviously not the only one, there are different styles that involve different ways to use brush, but at the beginning this type of approach can be experienced, considering that the horizontal stroke, although it doesn’t look like, is very difficult to trace in the right way. It’s, in fact, one of the most important strokes in chinese calligraphy, by which a character often takes on balance or strength.
Even the position of the horizontal stroke determines its way of being written; imagine the horizontal stroke as a supporting beam of a roof, placed in the upper position, to protect what is below, such as in the “xià” character: 下. Now try to think of a kind of “partition”, a “sill” placed in the center of two floors, as in the “six” character: 六. Lastly, the horizontal stroke can serve as an inverse support, a plan on which to put things, a kind of bookcase, or shelf, as in the “tŭ” character: 土. In the light of these examples, you can understand how the horizontal stroke decisively contributes to the construction of the character already from its foundations.
In the two images below I’ll show you in a more “schematic” way the two horizontal strokes types that exist in calligraphy, the long one and the short one, with three examples of their use in characters. The red line is the indicative one:
Here the short one:
In the boxes marked with the hazard symbol you can see the most common mistakes occur drawing vertical stroke. N ° 1 was performed with too large brush movements at the stroke head (or the same was rested too firmly, causing a large ink stain). No. 2 was drawn without maintaining a constant brush pressure on the paper. This type of error is very common when you begin to draw characters as it’s very difficult to keep your hand firm; this kind of situation leads to error n. 3, where the brush didn’t rest enough, causing a kind of continuous forceless line.
The second stroke we will see in this article is the vertical one, called “shù”, whose meaning is, in fact, “vertical” and whose character it represents is “竖”. As the horizontal stroke is traced with a movement that rises slightly upwards, the vertical stroke represents the spine of a character, a scepter, or a pillar, and is then drawn perfectly vertical, from top to bottom. The shape of the vertical stroke reminds horizontal one, even in its execution. For a proper 竖 action, do this: place the brush firmly on paper(not too much) with an angle of about 45 ° to give a definite shape to the stroke head and rotate it slightly to give the direction that the stroke itself will have. Lower down with a faster movement (as in the horizontal section, the center is narrower) and at the end of the stroke turn the brush back to give shape to the tail. It’s possible to go back a few millimeters in order to get a more natural effect. In the posted image you can see the movement of the brush during the execution of 竖. Think of the vertical stroke as a column of a character; it can intervene to support parts, as in “shàng”: “上”, or to act as divisors in symmetrical parts, as in “mù”: “木”; can balance a part like a weighing needle, such as “xià”: “下” or divide into two parts (not necessarily symmetric) a character, as in “wài”: “外”. The presence of “héng” and “shù” is therefore of fundamental importance in the art of writing.
As mentioned earlier, this is not the only way to draw 竖, vertical stroke has a very used variant: the “hanging needle”, also called “vertical needle”, where the stroke has a pointy end and which can be seen in the posted images. In this case the brush, instead of performing the stroke tail in a definite way, it rises more and more from the sheet, producing a thinning that will culminate with the tip.
As with the horizontal stroke, I’m going to show you the two types of vertical stroke with character examples. Dew drop:
Vertical needle:
Given the errors mentioned in this article, how do you do it in order to avoid having them? It will seem trivial, but the secret to mastering the art of calligraphy is simply writing, writing and then writing, until strokes will come out naturally. The latter definition, though simple, encloses in it a profound and long work that should start first of all by ourselves. The naturalness of gestures is something that has to do with nature itself; if we are able to “feel” we’re a part of a whole, then even “simple” movements such as the use of a brush to trace a “simple” stroke will become something we will not even think of. Beginner’s practice usually starts from writing regular style, as it is the most standardized and contains most of writing techniques with the brush, while you can go to writing faster only once learned and done the basic techniques. Chinese calligraphy will then become like learning to stand, walk and finally run. If we want to run without even knowing how to stand we will end up with falling and getting hurt, sometimes losing the will to want to start over. Then take your sheet, brush and write, write, write.
