
Benvenuti a questo nuovo articolo riguardante i tratti principali; vedremo qui l’ultimo di essi, quello piegato. Viene chiamato in diversi modi, ma ciò che accomuna tutti i nomi è il fatto che per essere tracciato, il pennello deve cambiare direzione in modo più visibile. Abbiam visto con l’uncino il primo dei tratti con cambio di direzione; qui esso si fa veramente importante e potremmo dire che il tratto piegato è l’unione di due tratti tramite una sorta di “giunto”; anche per questo motivo il piegato ha veramente molte varianti, basti pensare a quanti ne abbiam visti e al fatto che possano essere messi insieme (varianti comprese). Qui sotto è possibile vedere il tipico tratto piegato che unisce un tratto orizzontale ad uno verticale:
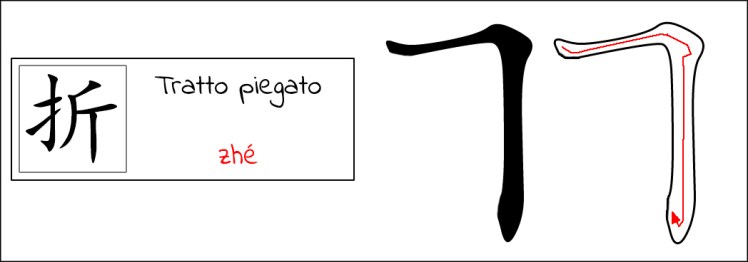
Il nome, “zhé”, ha come carattere “折”. La tracciatura del tratto presenta solitamente dei punti in comune, in quanto dipende innanzitutto da quali tratti si comincia (due o più) e che tipo di giunzione si andrà ad aggiungere. Nel caso sopra indicato, il tratto parte come un orizzontale, quindi:
– Partire dal punto a sinistra, creare la testa scegliendo una delle due tecniche descritte in precedenza (lasciare scoperta o coprire la testa) e quindi spostarsi verso destra;
– Arrivati al punto in cui l’orizzontale va ad unirsi al verticale, appoggiare il pennello a 45° in modo da creare un’area piuttosto ampia di inchiostro ed effettuare una breve pausa;
– Una volta che la giuntura è formata, muoversi verso il basso, a creare il tratto verticale e chiudere la coda seguendo una delle tecniche descritte in precedenza (a seconda del carattere potremo avere una coda definita o un ago sospeso);
Arrivati a questo punto vi farò vedere una variante “speculare”, la quale parte con un tratto verticale, per poi finire (in questo caso) con un tratto ascendente verso l’alto (ma potrebbe essere anche un orizzontale):

Questi tipi di variante sono abbastanza comuni; in questo articolo vorrei postare nello specifico la variante riportata qui a sinistra, per una questione di spazio e di tempo; i tipi di tratti combinati, o piegati, sono molti e preferirei farveli vedere attraverso le nostre classiche schede con alcuni esempi, affinchè possiate rendervi conto di che cosa stiam parlando e cominciare a vedere i caratteri un po’ più “tecnicamente”. Ciò che invece vi farò vedere sono un paio di errori abbastanza comuni nella tracciatura del tratto piegato:

Da come è possibile vedere sono errori già visti con l’uncino, ma che qui assumono una connotazione ancora più negativa, “visivamente” parlando. A sinistra il tratto è stato tracciato come un arco, senza soluzione di continuità e la giuntura appare inesistente, mentre a destra le tre parti del tratto sono state esasperate, dando luogo ad un “palo della luce”.
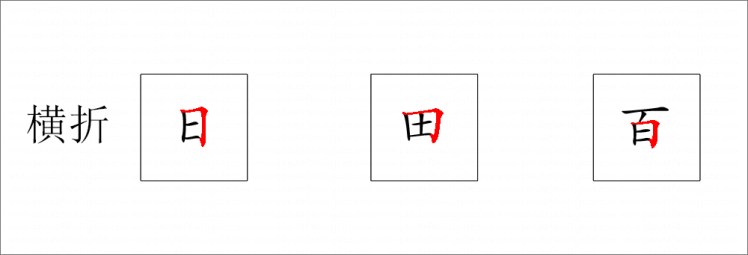
Ed ecco come promesso alcuni esempi di carattere per alcuni tipi di varianti di tratto piegato:
Tratto orizzontale di partenza, poi verso il basso; usato molto per quei caratteri “quadrati”:
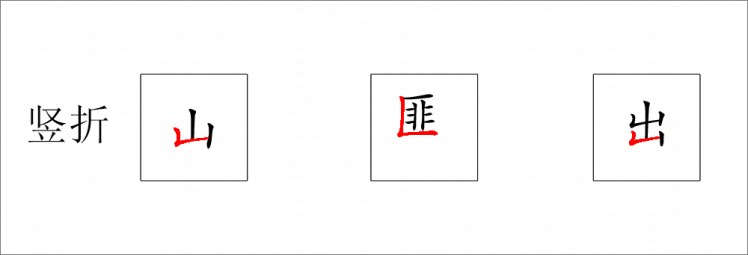
Partenza verticale, poi direzione orizzontale:
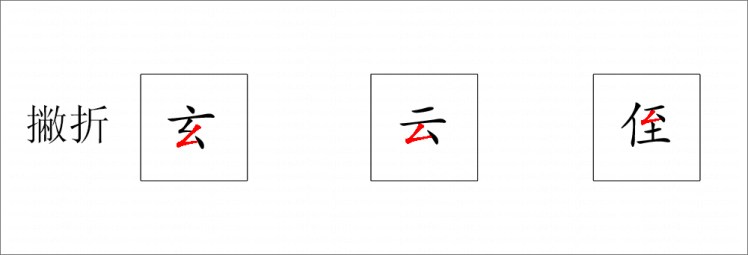
Questo tratto parte da un discendente a sinistra, poi gira in orizzontale:
Qui sotto abbiamo un esempio di unione di più tratti, grazie alla quale è possibile ottenere forme dall’aspetto complesso; è un tipo di tratto non così semplice da padroneggiare:

Stay tuned!

Welcome to this new article regarding main strokes; we will see here the last of them, the bent one. It is called in different ways, but what unites all the names it’s the fact that to be traced, the brush must change direction in more visible way. We saw with the hook the first of stokes with change of direction; here it becomes really important and we could say that the bent stroke is the union of two strokes through a sort of “joint”; also for this reason the bent stroke really has many variations, just think of how many we have seen and the fact that they can be put together (including variants). Below you can see the typical bent stroke that combines a horizontal to a vertical stroke:
The name, “zhé”, has “折” as character. The tracing of the stroke usually has some points in common, as it depends first of all on which strokes you start (two or more) and what type of joint will be added. In the case above suitable, the stroke starts as a horizontal, so:
– Start from left side, create the head of stroke by choosing one of the two techniques described above (leave the head uncovered or cover it) and then move to the right;
– Reached the point where the horizontal stroke joins the vertical one, place the brush at 45 ° to create a rather large area of ink and make a short pause;
– Once the joint is formed, move downwards, create the vertical stroke and close the tail following one of the techniques described above (depending on the character we can have a defined tail or a hanging needle);
At this point I will show you a “specular” variant, which starts with a vertical stroke, and then ends (in this case) with an upward stroke (but it could also be a horizontal):

These types of variant are quite common; in this article I would like to specifically post the variant just shown, for a question of space and time; bent strokes are many and I would rather let you see through our examples, so you can realize what we are talking about and begin to see the characters a bit more “technically”. What I will show you instead are a couple of common mistakes in tracing the bent stroke:

As you can see, those are mistakes already seen with the hook, but here they assume an even more negative connotation, “visually” talking. Left stroke has been traced like an arch, and the joint appears to be inexistent, while on the right the three parts of the stroke have been exasperated, giving rise to a “light pole”.
And here’s as I promised, some examples of character with some types of bent stroke variants:
Horizontal starting stroke, then downwards; used a lot for “square” characters:
Vertical starting, then horizontal:
Left tilted starting stroke, then horizontal:
Below we have an example of union of several strokes, thanks to which it is possible to obtain complex-looking shapes; it’s a kind of not so simple stroke to master:
Stay tuned!
