
In questo nuovo articolo parleremo di una parte importante a riguardo dei caratteri cinesi: l’ordine di scrittura. Perché è così importante sapere il modo in cui si scrivono? Facciamo un esempio: in italiano, o in inglese o in qualsiasi lingua che utilizza lettere latine, se noi scriviamo una parola, sappiamo come scriverla senza nemmeno pensarci. La lettera “A” per esempio, viene solitamente scritta tracciando prima il “tetto” partendo da sinistra e poi la stanghetta finale, ma nulla ci vieterebbe di scriverla partendo da destra o addirittura scrivere prima la stanghetta orizzontale e poi il resto. Il risultato finale sarebbe comunque la lettera “A”, forse semplicemente un po’ più “strana” nella forma. Ecco… per i caratteri cinesi non è così “semplice”; facciamo una premessa necessaria: tutto ciò che viene detto vale soprattutto per l’arte della calligrafia dove l’ordine dei tratti è tutto, ma anche per la normale scrittura a penna. Sarebbe bene abituarsi fin da subito a scrivere i caratteri cinesi nel modo corretto, onde evitare di prendere delle abitudini sbagliate che col tempo sarebbero molto difficili da correggere. Certo, se si scrive al pc tutto questo non conta.
Scrivere un carattere nel modo sbagliato non solo è un errore, ma renderà il carattere stesso “squilibrato” e “brutto”, in un’arte dove la bellezza della scrittura risiede anche nella restituzione agli occhi di un’armonia a volte difficile da cogliere; un carattere, una frase è “bella da vedere” e non sappiamo come mai. Quel “segreto” è racchiuso in alcune regole che una volta apprese contribuiranno a rendere anche i vostri caratteri degni di essere esposti. Non dimenticate che nella calligrafia il pennello traccia su carta ciò che nasce dalla vostra mente, ma oltre al “sapere cosa scrivere” esso attinge anche dalla sezione “sapere come scrivere”. Le due cose sono strettamente legate; se so cosa scrivere ma non so il modo corretto di scriverlo, il risultato finale sarà sì una frase, ma senza alcuna “forza” e non solo, a volte anche letteralmente difficile da leggere. Viceversa se so come scrivere ma non so cosa scrivere mi troverò di fronte ad un foglio bianco senza anima. Ecco perché è importante studiare e praticare nello stesso modo, al fine di far avanzare le due cose in modo armonioso ed evitare squilibri.
Passata la dovuta introduzione, cominciamo ad addentrarci dei meandri della teoria. Elencherò in questa lezione alcune regole molto semplici da seguire. Non sono molte, quindi non credo ci sarà alcuna difficoltà da parte vostra a memorizzarle. Ebbene sì, almeno per gli inizi sarebbe meglio letteralmente impararle a memoria, per poi dimenticarle una volta fatte proprie.
REGOLA 1: SCRIVERE DALL’ALTO AL BASSO
I caratteri formati da tratti che si sviluppano in verticale vanno scritti dall’alto verso il basso. Qui di seguito verrà indicato il carattere “sān”, che si presta bene a questo tipo di regola:
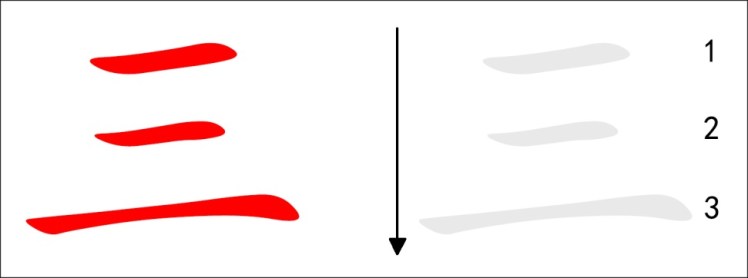
Come potete vedere non è poi così difficile da comprendere; questo tipo di regola rende molto semplice il vedere cosa si sta scrivendo e in che modo; se partissi dal basso e andassi verso l’alto, la mia mano coprirebbe la parte già scritta, non dandomi la possibilità di vedere il modo in cui il carattere si sta evolvendo e col rischio di commettere errori di proporzione.
REGOLA 2: SCRIVERE DA SINISTRA A DESTRA
Nei caratteri con sviluppo orizzontale è importante sapere che gli stessi vanno scritti da sinistra verso destra. Di seguito verrà messo l’esempio di “buono”, formato da una parte “donna” e una “bambino”:
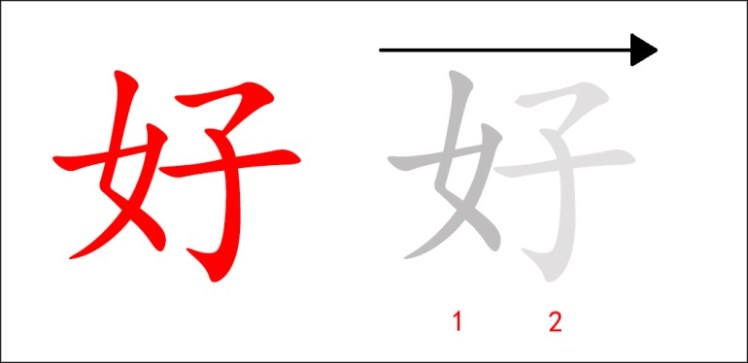
Questa regola presenta una piccola variante; come potete vedere nell’immagine sopra, la parte a sinistra rimane a sinistra e la parte a destra rimane a destra. Vi sono dei caratteri in cui la parte a sinistra si sviluppa fino ad arrivare a destra, in quel caso la parte a sinistra viene scritta per ultima. Vediamo un esempio, che chiarirà più di 1000 parole: nel carattere “via”, come in tanti altri, la parte a sinistra presenta un tratto che viene tracciato fino ad arrivare a destra, come una “barca”:
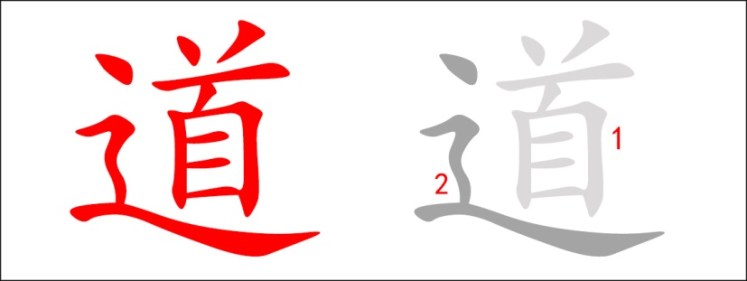
Tale tratto verrà scritto dopo quello a destra.
REGOLA 3: IL TRATTO ORIZZONTALE PRIMA DI QUELLO VERTICALE
Nei caratteri dove sono presenti sia “héng” che “shù” (se non sapete cosa significhi andate a dare un occhiata alle lezioni passate sui tipi di tratto), héng viene scritto prima di shù. Vediamo un semplice esempio che più semplice non si può, in quanto carattere veramente formato semplicemente da un tratto orizzontale e uno verticale. Il n. 10:

Anche in questo caso vi è una piccola variante: quando un tratto orizzontale è posizionato alla base del carattere, esso viene scritto per ultimo, anche se vi è un tratto verticale. Vediamo l’esempio di “wáng”:
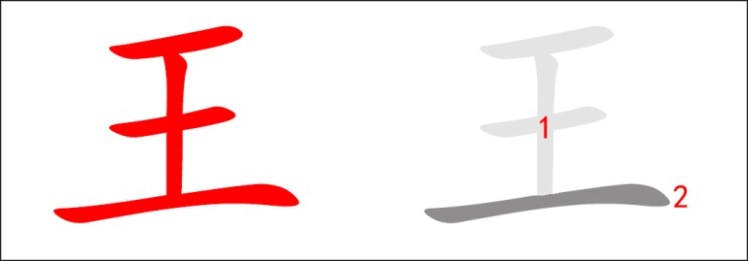
Come potete vedere, prima scrivo il blocco n.1, seguendo le normali regole appena apprese (quindi i due orizzontali, dall’alto verso il basso e poi il verticale) e poi chiudo con l’ultimo orizzontale. Non scrivete questo carattere tracciando i tre orizzontali e poi il verticale per ultimo perché è un errore, anche se in teoria sembra di no.
REGOLA 4: IL TRATTO DISCENDENTE A SINISTRA PRIMA DI QUELLO DISCENDENTE A DESTRA
Alla fine questa regola è un po’ una trasposizione di quella precedente, cambia solo il tipo di tratto. Vediamo un esempio anche qui molto semplice:
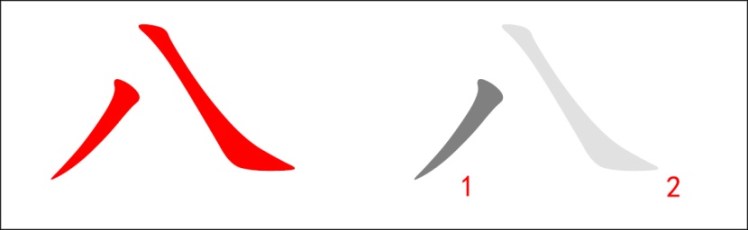
Su questa regola c’è poco da dire, semplicemente quando vedrete caratteri formati da discendenti, ricordatevi quest’ordine.
REGOLA 5: TRATTO CENTRALE PRIMA DI QUELLI AI LATI (PER CARATTERI SIMMETRICI)
Capita spesso che vi siano dei caratteri che presentano una parte centrale (solitamente un tratto verticale) e due parti più o meno simmetriche ai lati. Un tipico esempio arriva dal carattere “piccolo”:
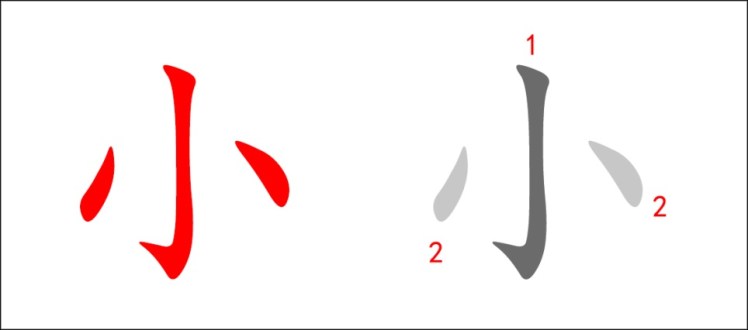
Come potete vedere dalla numerazione indicata, in casi come questi si traccia per primo il tratto centrale, poi i tratti che stanno ai lati, naturalmente seguendo la regola già vista, prima sinistra, poi destra (qui ho messo due “2” solo per far vedere che i tratti ai lati vengono dopo quello centrale).
REGOLA 6: PRIMA LA CORNICE, POI L’INTERNO
Questa regola si applica nel caso di cornici aperte. Cosa intendiamo per cornici? Quei caratteri che presentano una parte centrale e una parte che ci gira attorno, come una cornice, appunto. Vediamo l’esempio di “interno”:
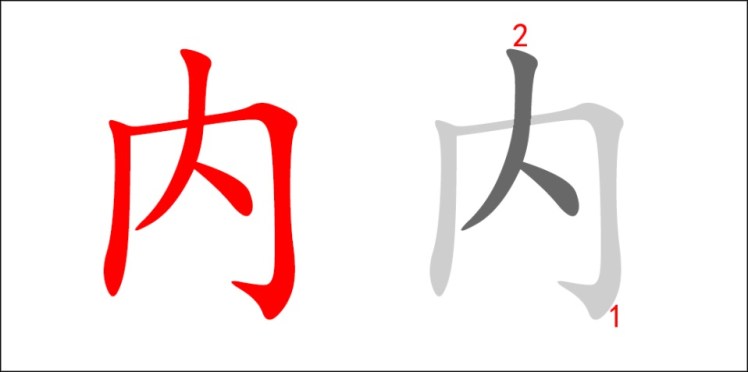
Come potete vedere ho disegnato prima il quadrato aperto, poi i due tratti (che, se avete studiato, verranno tracciati nell’ordine: discendente a sinistra e discendente a destra). Vi ricordate quando abbiamo parlato della regola “prima la parte a sinistra poi a destra”?, ecco, abbiamo visto la variante dei tratti che da sinistra si estendono fino a destra e in quel caso vengono tracciati per ultimi. Quella variante rientra, in un certo modo anche come variante della cornice, precisamente la cornice inferiore di un carattere; come già detto, se la cornice si trova sotto (abbiamo visto il carattere “via”), essa verrà tracciata per ultima.
REGOLA 7: PRIMA L’INTERNO, POI CHIUDO LA CORNICE
Questa regola vale per tutti quei caratteri che presentano una cornice completa e chiusa. Per tracciare quel tipo di caratteri dobbiamo innanzitutto seguire la regola appena descritta, quindi:
– comincio a tracciare la cornice (senza chiuderla);
– Traccio ciò che è dentro la cornice;
– Traccio l’ultimo tratto di cornice per chiuderla;
Vediamo un esempio:
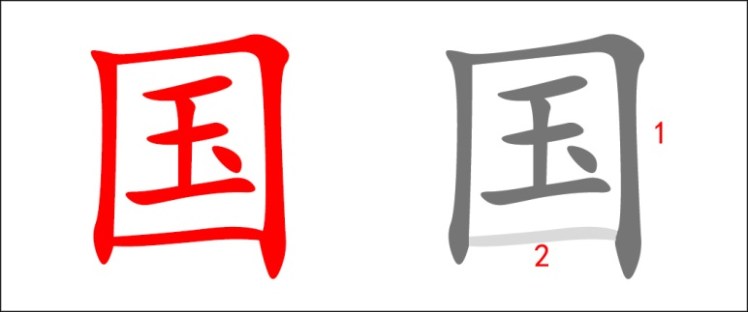
Nell’esempio sopra riportato ho tracciato la cornice (i primi tre tratti) poi l’interno, poi ho chiuso con il tratto orizzontale per chiudere del tutto.
CONSIDERAZIONI FINALI
Partiamo subito col dire che queste regole sono regole generali e l’ordine non è definitivo o immutabile; il fatto che le abbia numerate è solamente per dividerle, in molti libri potete trovarle scritte con altri ordini, la cosa non ha importanza, l’importante è che vengano assimilate nel modo giusto.
La seconda considerazione riguarda alcune altre regole meno conosciute (in realtà conosciute tanto quanto queste ma spesso non indicate sui libri se non quelli più “specializzati”). Qui ho voluto mettere le principali. In futuro posterò un’altra lezione con quelle che solitamente non si vedono molto in giro ma che fanno parte delle regole calligrafiche.
Terza considerazione, forse la più importante… imparate queste regole per dimenticarle, perché se deciderete di avventurarvi nel mondo della calligrafia vedrete che spesso e volentieri tali modo di scrivere non vengono rispettati, per diversi motivi. Quindi è utile saperle perché sono le basi, ma poi il tutto dovrà essere adattato a voi.

In this new article we will talk about an important part about Chinese characters: the order of writing. Why is it so important to know how they are written? Let’s take an example: in Italian, or in English or in any language that uses latin letters, if we write a word, we know how to write it without even thinking about it. The letter “A” for example, is usually written by first tracing the “roof” starting from the left and then the final bar, but nothing would forbid us to write it starting from the right or even write first the horizontal bar and then the rest. The final result would still be the letter “A”, perhaps simply a bit ‘more “strange” in the form. For Chinese characters is not so “simple”; let’s make a necessary premise: all what we’re going to say is related to the art of calligraphy where the order of the strokes is everything, but also for the normal pen writing. It would be a good idea to get used to writing Chinese characters correctly in order to avoid taking wrong habits that would be very difficult to correct over time. Of course, if you write to the PC this doesn’t count.
Writing a character in the wrong way is not only a mistake, but will make the character itself “unbalanced” and “ugly”, in an art where the beauty of writing also lies in the return to the eyes of a harmony sometimes difficult to grasp; a character, a phrase is “beautiful to see” and we don’t know why. That “secret” is contained in some rules that once learned will help to make even your characters worthy of being exposed. Don’t forget that in calligraphy the brush traces on paper what comes from your mind, but in addition to “knowing what to write” it also draws from the section “know how to write”. These two things are closely linked; if I know what to write but I don’t know the correct way to write it, the final result will be a sentence, but without any “strength” and not only, sometimes also literally difficult to read. On the other hand, if I know how to write but I don’t know what to write, I will find myself faced with a blank sheet without a soul. This is why it‘s important to study and practice in the same way, in order to advance the two things in a harmonious way and avoid imbalances.
After the due introduction, let’s begin to penetrate the meanderings of the theory. In this lesson I will list some very simple rules to follow. They are not many, so I don’t think there will be any difficulty on your part to memorize them. Yes, at least at the beginning it would be better to literally learn them by memorize, and then forget them once they have been taken home inside us.
RULE 1: WRITE FROM TOP TO LOW
Characters formed by vertically developing strokes must be written from top to bottom. Below we can see “sān” character, which lends itself well to this type of rule:
As you can see it’s not so difficult to understand; this kind of rule makes it very easy to see what you are writing and how; if I start from the bottom going upwards, my hand would cover the part already written, not giving me the chance to see the way in which the character is evolving and with the risk of making proportion mistakes.
RULE 2: WRITE FROM LEFT TO RIGHT
In characters with horizontal development it’s important to know that they must be written from left to right. Below is an example of “good”, made up of a “woman” and a “child”:
This rule presents a small variant; as you can see in the image above, the left side remains on the left and the right side remains on the right. There are some characters in which the left side develops up to the right, in which case the left side is written last. Let’s see an example, which will clarify more than 1000 words: in the “way” character, as in many others, the left side presents a stroke that is traced up to the right, like a “boat”:
This stroke will be written after the one on the right.
RULE 3: THE HORIZONTAL STROKE BEFORE THE VERTICAL
In characters where there are both “héng” and “shù” (if you do not know what does it means go to have a look at the lessons on types of strokes), héng is written before shù. Let’s look at a simple example that can’t be simpler, since it is a character that is really simply made up of a horizontal and a vertical stroke. The number 10:
Also in this case there is a small variant: when a horizontal stroke is positioned at the base of the character, it’s written last, even if there is a vertical stroke. Let’s look at the example of “wáng”:
As you can see, first I write the block n. 1, following the normal rules just learnt (two horizontal strokes, from top to bottom and then the vertical one) and then I close with the last horizontal. Don’t write this character by tracing the three horizontal strokes and then the vertical one as last one because it’s a mistake, even if in theory it doesn’t.
RULE 4: THE LEFT STROKE BEFORE THE RIGHT STROKE
This rule is similar to the previous one, only the type of stroke changes. Let’s see a simple example:
There’s not so much more to say about this rule, simply when you see a character formed by descendants strokes, remember this rule.
RULE 5: CENTRAL STROKE BEFORE THOSE TO THE SIDES (FOR SYMMETRIC CHARACTERS)
It often happens that there are characters with a central part (usually a vertical stroke) and two parts more or less symmetrical to the sides. A typical example comes from the “small” character:
As you can see from the indicated numbering, in cases such as these, you first trace the central stroke, then the other two, obviously following the rule already seen, first left, then right (here I put two “2” just to show that side strokes come after the central one).
RULE 6: FIRST THE FRAME, THEN THE INTERNAL
This rule applies in the case of open frames. What do we mean by frames? Those characters that have a central part and a part that turns around it, like a frame, in fact. Let’s look at the example of “inside”:
As you can see I drew the open square first, then the two strokes (which, if you have studied, will be traced in order: descending to the left and descending to the right). Do you remember when we talked about the rule “first the left side then right one” ?, we have seen the variant of strokes that from left side extend to the right and in that case are traced last. That variant belongs, in a certain way, also as a variant of the frame, precisely the lower frame of a character; as already mentioned, if the frame is below (we have seen the character “way”), it will be traced last.
RULE 7: FIRST INSIDE PART, THEN CLOSE THE FRAME
This rule applies to all those characters that have a complete and closed frame. To trace that type of characters we must first follow the rule just described, then:
– I begin to trace the frame (without closing it);
– I trace what ‘s inside the frame;
– I draw the last part of the frame to close it;
Let’s see an example:
In the example above I traced the frame (the first three strokes) then the inside, then I closed with the horizontal stroke to close it completely.
FINAL CONSIDERATIONS
Let’s start immediately by saying that these rules are general rules and the order is not definitive or immutable; the fact that I numbered them is only to divide them, in many books you can find them written with other orders, it doesn’t matter, the important thing is to assimilate them in the right way.
The second consideration concerns some other less known rules (actually known as much as these but often not indicated in books if not those more “specialized”). Here I wanted to put the main ones. In the future I will post another lesson with less known rules but that are part of the calligraphic world.
Third consideration, perhaps the most important … learn these rules to forget them, because if you decide to venture into the world of calligraphy you will see that often this way of writing is not respected, for different reasons. So it’s useful to know them because they are the basis, but then everything will have to be adapted to you.
