
Benvenuti a questo nuovo articolo riguardante i principali tratti utilizzati nella scrittura dei caratteri cinesi. Ci eravamo lasciati con i “piedi” degli stessi, rappresentati dai tratti discendenti a destra e sinistra. In questa lezione andremo a vedere un ulteriore tratto, solo uno, e precisamente il tratto ascendente. Il motivo per cui non introduco più di un tratto è per una sorta di continuità logica riguardante le modalità di tracciatura. Avevo detto che avrei presentato i principali 8 tratti e con questo siamo a sei, ne mancano ancora due. Cosa contraddistingue la diversità fra questi sei tratti e gli ultimi due? Semplicemente, fino ad adesso abbiamo visto tratti i quali potevano essere tracciati senza cambiamenti significativi di direzione del pennello; si può dire che i primi sei tratti vengano tracciati con un unico movimento, in una determinata direzione. Gli ultimi due, cioè l’uncino e il piegato, comportano un cambio visibile di direzione, quindi ho preferito inserirli in un contesto nuovo.
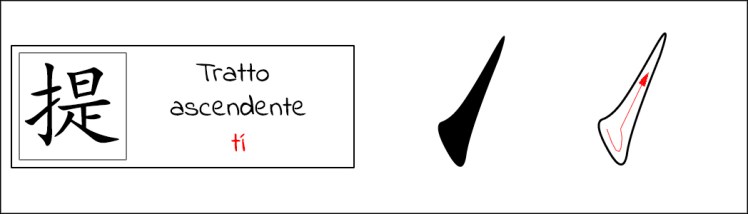
Ma passiamo a vedere il nostro tratto ascendente; come dice la parola, esso viene tracciato dal basso verso l’alto; il suo nome è “tí” con carattere “提”A volte assomiglia ad un punto allungato, quasi sempre sembra un discendente a sinistra e ciò che cambia è la direzione della pennellata:
Solitamente il tratto ascendente viene eseguito più velocemente , utilizzando più forza; la procedura per disegnarlo:
– appoggiare il pennello in basso a sinistra, dove il tratto avrà inizio; in questa fase è indifferente utilizzare tecnica che mostri o nasconda la testa e aspettare un piccolo lasso di tempo;
– cominciare a muovere il pennello verso l’alto e destra, gradualmente rilasciando pressione;
– terminare il tratto con una punta;
Per quanto riguarda questo tratto non c’è molto di più da dire, salvo postarvi come sempre gli esempi di utilizzo dello stesso:

Nel prossimo articolo vedremo nello specifico l’uncino, nelle sue varianti.
Stay tuned!

Welcome to this new article about main strokes used in writing chinese characters. We ended last lesson with “feet” of characters, represented by the descending strokes on the right and left. In this lesson we will see a further stroke, only one, and precisely the upward stroke. The reason why I don’t introduce more than one stroke is due to a sort of logical continuity concerning the methods of tracking. I had said that I would have presented the main 8 strokes and with this one we have six, two are still missing. What distinguishes the difference between these six strokes and the last two? Simply, until now we have seen strokes that could be traced without significant changes in the direction of the brush; it can be said that the first six strokes are traced with a single movement, in a certain direction. The last two, that is the hook and the folded, involve a visible change of direction, so I preferred to insert them in a new context.
But let’s move on to see our ascending stroke; as the word says, it is drawn from the bottom to the top; his name is “tí” with character “提“. Sometimes it looks like an elongated dot, almost always seems a descendant on the left and what changes is the direction of the stroke:
Usually the ascending stroke is executed faster, using more strenght; this the procedure for drawing it:
– place the brush on the bottom left, where the stroke will start; in this phase it is indifferent to use technique that shows or hides the head and wait a small amount of time;
– begin to move the brush up and right, gradually releasing pressure;
– end the stroke with a tip;
As far as this section is concerned, there is not much more to say, except for posting as usual the examples of its use:
In the next article we will see specifically the hook, in its variants.
Stay tuned!
